


People who ask for data recovery services often request to recover data from a “lost” partition. The reasons for such loss can vary a lot: drive malfunctions, unsuccessful attempts to disk space allocation, viruses, etc.
Today we will try to find out why we cannot see the data in such cases and how we can recover it with the PC-3000 hardware-software systems. The article will especially benefit those of you who just start to make their first steps in data recovery.
A bit of theory
Let’s consider the typical data organization on a drive to figure out why we cannot get access to the data via the operating system tools.

The common scheme of disk space allocation
To reach the files here we need:
- to read MBR in sector 0, where we learn that a certain partition starts at sector 2048 and takes up N sectors;
- to read sector 0 of the partition and find the Boot NTFS structure there to understand that we deal with the NTFS file system, so we can get some information regarding its metadata;
- to find other metadata of the file system, using the Boot NTFS information, to display the user’s data.
Basically, the metadata can be divided into 3 types:
- The metadata on the disk space allocation. In our example, it’s MBR, but GPT, Apple Partition Scheme, the LDM and LVM structures, etc. can also be included here.
- The file system entry point which is necessary for getting the information regarding the file system type, and which usually contains some important parameters. In our example, it’s Boot NTFS, but Boot for FAT and ExFAT, Superblock for EXT, XFS, UFS, and ReiserFS also belong to this category.
- Other metadata of the file system — all the structures, which store the information about the location, names, and attributes of catalogs and files. These are MFT records for NTFS, the FAT table and catalogs for FAT12/16/32, the inode tables for EXT, etc.
In case of type 1 or type 2 of metadata issues, the OS may stop displaying the partition. In other words we will see the problem of the lost partitions.
Practice to master your data recovery skills
«You need to format the disk in drive before you can use it»
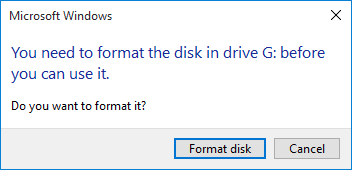
Windows message when you try to open a partition with damaged Boot FAT32
In most cases, users see this message instead of their data, stored on a flash drive or an external HDD with the FAT file system. This is what we get if we damage the main FAT Boot.
Speaking of the classification, this is the case of damaging the file system entry point. The PC-3000 Systems know where the Boot copy is stored, therefore, if it’s not damaged, the partition inside Data Extractor will open without any additional actions. However, this case is not that interesting, so let’s look at the case where both FAT Boots are damaged. As a result, the partition won’t open either in Windows or in the Data Extractor. We’ll try the simplest way to get a result – by launching the Quick disk analysis mode.
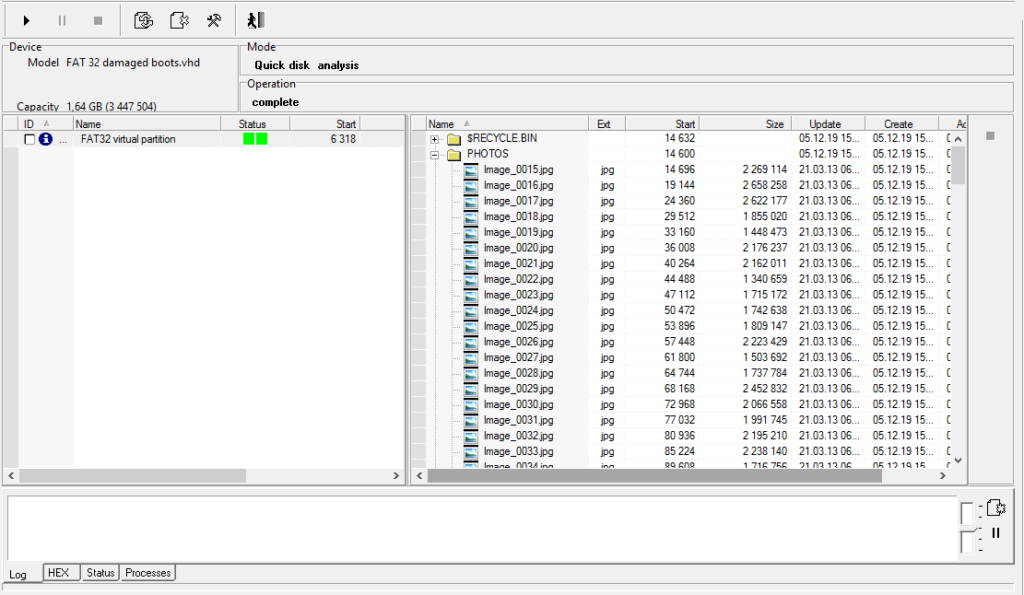
Quick disk analysis has found FAT32 File System
The virtual partition FAT32 was added right after the launch. On the right, we can see what data it contains. If we return to the Data Extractor file explorer now, there will already be a virtual partition there. We can save the data now.
Without going into detail, we can say that FAT Boot contains quite important data for opening the file system, nevertheless, FAT tables and catalogs analysis allows us to define these parameters and build an artificial FAT Boot.
The FAT32 table that we have found allowed us to begin such an analysis. It could also have been launched from the raw recovery as we will do it for the ExtX Superblock in the next example.
| The Quick disk analysis is an automatic method, used for finding the “lost” file systems. FAT32 is only a particular case, and the mode is intended for searching for all supported file systems. |
This method is based on the following observations:
- partitions are usually located next to each other and cover the disk almost completely, i.e. the “gaps” between partitions as well as the margins from the “edges” of the disk do not exceed several thousand sectors;
- the metadata on the disk organization (including the copies) are located either at the beginning or at the end of the disk;
- the entry points to the file systems and their copies are often located at the beginning and at the end of a partition.
Let’s consider another example of the disk organization in order to illustrate these observations.
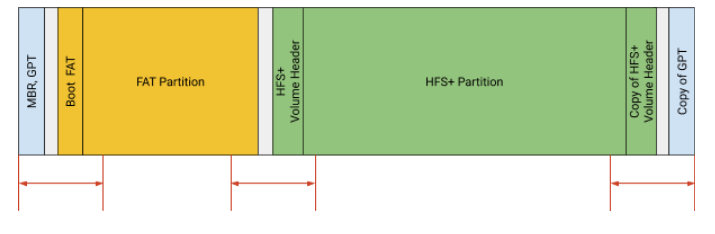
The disk with GPT, FAT32 and HFS+ partitions
- The GPT structures, which the information about partitions, are located at the beginning and at the end of the disk (MBR which indicates the only disk-size partition, is usually written before GPT structures in sector 0);
- the beginning of the FAT32 partition is close to the beginning of the disk, and its Boot – the entry point to the file system – is located in the first sector of the partition;
- the HFS+ partition almost immediately follows the FAT32 partition, and its beginning contains the HFS+ Volume Header – the entry point to the HFS+ file system;
- the HFS+ partition ends close to the end of the disk, and at the end of the partition there is a copy of the HFS+ Volume Header;
- a GPT copy is located at the end of the disk
If we deal with an unknown disk, it makes sense to scan the space at the beginning and at the end of the disk. If you find information about partition locations or are able to recover the whole partition, then you can add the ranges, which are close to the beginning and the end of the partition, to your search, as there is a strong chance to find an adjacent one.
The purpose of such scanning is to find either an entry point to the file system or structures, which will let us recover the information about the partition (in this example it was the FAT32 table).
The Quick disk analysis scan the most “interesting” ranges and enlarge them automatically as the scanning progresses. If a proper structure is found, the method of adding a virtual partition is launched. Then all recovered partitions get displayed in the mode frame, where the file system tree can be seen straight away.
Is there life after formatting?
The possibility and methods of recovering data after the “quick” formatting is a topic worthy of a separate article. In some cases, however, it can be pretty simple. Let’s consider such a case: a drive with installed Ubuntu (which creates the EXT partition by default), was extracted from the computer, then connected to another one with installed Windows and formatted in NTFS. Right after that, the drive was taken to the recovery.
In this case we can also just run the Quick disk analysis as we did previously. But let’s try another way – to start the Raw Recovery to check out the drive.
| The Raw Recovery is a specialized mode to search for the user’s data (images, documents, etc.) and the metadata of file systems. The search is based on the analysis by means of regular expressions as well as internal algorithms of checking various structures, i.e. it doesn’t depend on the logical disk organization (what file system is there and if there are any damages). In other words, the mode does the File Carving. |
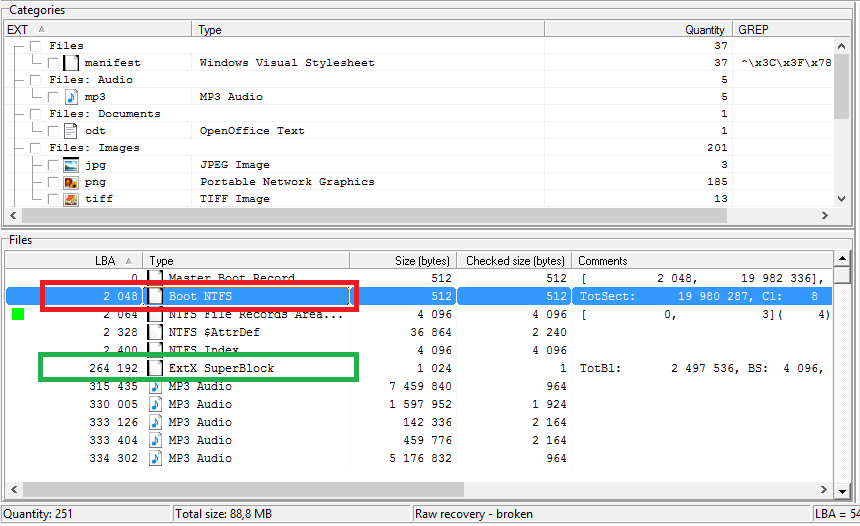
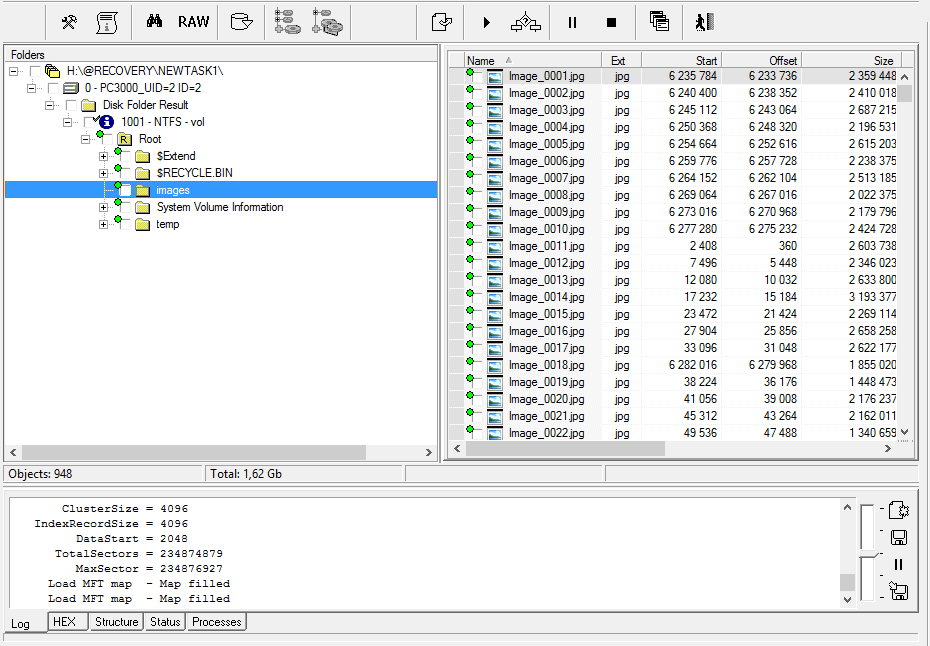
The RAW Recovery results
The NTFS partition begins with LBA: 2048. The EXT partition might have also begun here, but we can’t know for sure. Further on we find several other NTFS-related structures. In sector 264 192 we can see one of the Superblock copies of the EXT file system. Let us state several important facts regarding the EXT file system:
- The space allocated for the file system is divided into equal groups (except for the last one, perhaps). The size of a group is indicated in the Superblock. In this example, it equals to 262144 sectors.
- The main superblock is located in group 0 and shifted to 1024 Bytes.
- The copies of the main superblock are written in some other groups with shift 0. These are group 1 and other groups, the numbers of which are the powers of 3, 5 and 7. Thus the beginning of the array is as follows: 0 (+1024 Bytes), 1, 3, 5, 7, 9, 25, …
- The superblocks of different partitions are easy to recognize by GUID, written in them.
Such organization provides us with two options:
- if the main superblock is damaged, there is a strong chance to find its copy;
- if we find several superblocks of the same partition and define their places in the sequence, we can define the exact place of the beginning of the partition.
These options are the basis for the method of adding a virtual partition that is available from the context menu on ExtX Superblock.
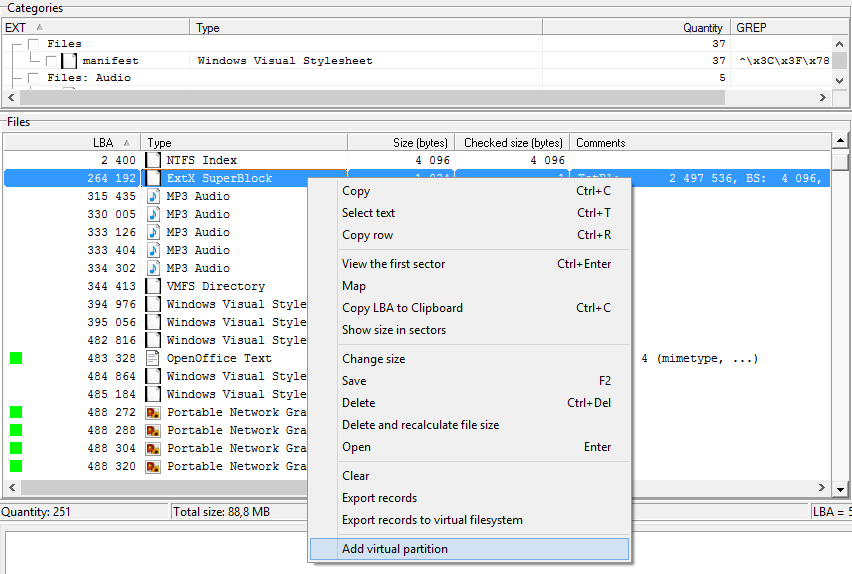
The running method of adding virtual partition on ExtX Superblock
In our case, the method easily defined the beginning of the partition – it’s sector 2048 as well. If we return to the file explorer, we see a new virtual partition there which provides access to the data. In this case, the “virtuality” means that Data Extractor obtains the information regarding the beginning, size, and type of the partition, as well as its entry point (the Superblock) not from the disk structures, but stores it in a specific database.
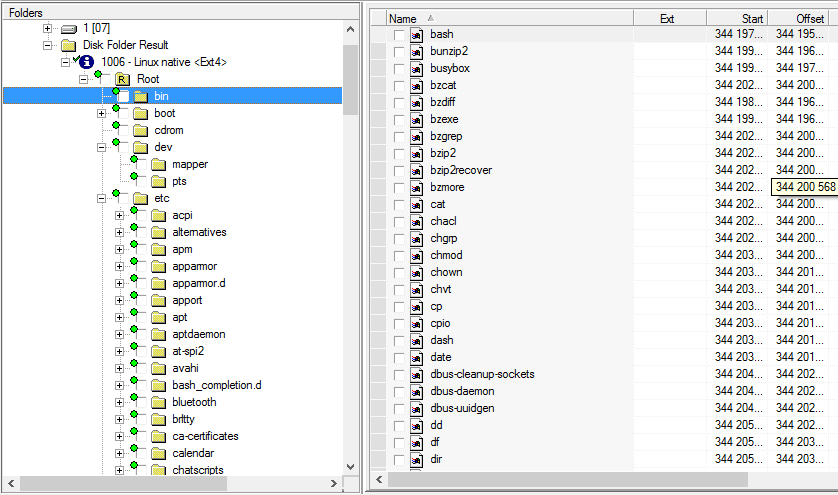
Ext4 virtual partition in the Data Extractor explorer
Let’s summarize the information above.
After reformatting, the entry point to the EXT file system, which contains the needed data, was erased with the structures of the new file system (NTFS). The Raw Recovery mode found the EXT Superblocks. Using a specific method, we added the virtual partition and get access to the data.
The previous method (Quick disk analysis) can also be applied here.
Without MBR

A drive with erased MBR in the Windows Disk Management
If LBA = 0 which usually contains MBR is damaged (BAD sector), we will see a similar picture in the Windows Disk Management as on the screenshot above. Now it is impossible to see the data of the partition, which was there, by conventional means. As we already know, we can use Quick disk analysis and RAW Recovery modes to solve the issues. But let’s try another one way, the least automated for better understanding of how everything works.
If we search for partitions manually, the first place to look should be where they begin in most cases: LBA 63, 2048, 264192, 409640 or power of two such as 128, 256, 512, etc.
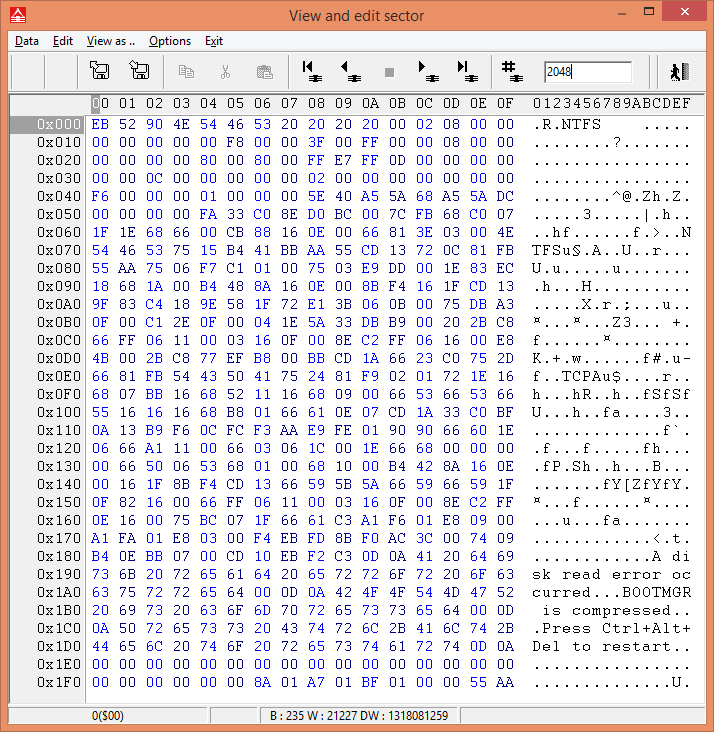
Boot NTFS at LBA-2048
When we open sector 2048, we see the signature, typical for Boot NTFS – the “NTFS” line at the beginning of the sector. Let’s use the option of viewing the sector as a Boot NTFS structure (View as…> Boot NTFS), and see that the relevant fields are valid. Then we add a virtual partition from the “Service” menu.
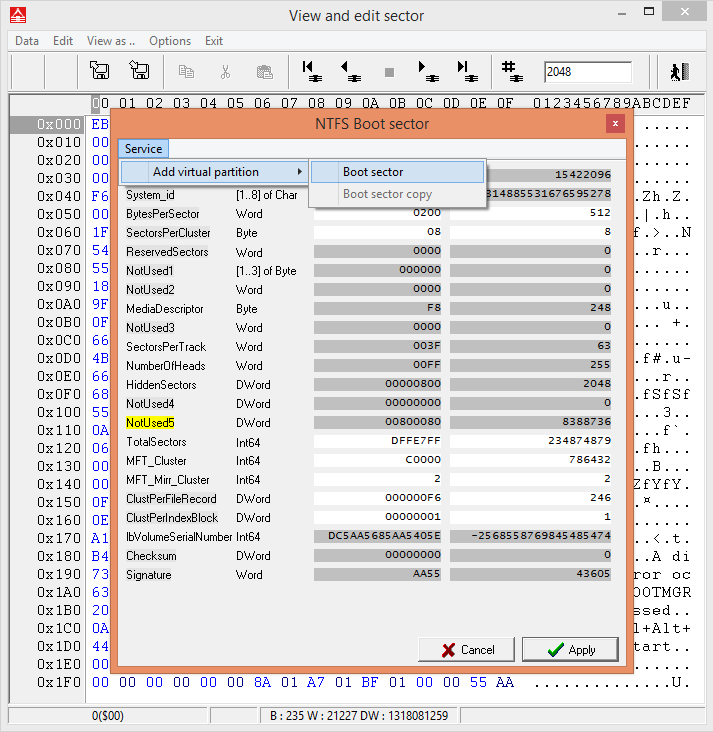
Virtual partition adding
After that, we can see the user’s data in the Data Extractor file explorer. By adding a virtual partition, we skipped the step of determining the beginning of a partition from MBR or other structures, as we clearly set the beginning and type of a new partition. All user data is visible in the Data Extractor file explorer since the Boot sector and other NTFS metadata are correct.
NTFS virtual partition
What did we learn from the article?
Due to the logical damage (erroneous drive formatting, viruses, software bugs, etc.) or physical drive issues (BAD-sectors, scratches, weak heads and so on) you may face the problem of “lost partition”. It is quite often issue on damaged drives. And the PC-3000 Systems with Data Extractor are the only solutions to deal with damaged drives in the most careful way.
There are the 2 most common reasons of the partitions loss:
- The information about partition location is damaged (e.g. MBR can’t be read)
- The file system entry point is damaged (e.g. Boot or Superblock is erased)
PC-3000 Systems with Data Extractor have several solutions to this problem. In this article we’ve discussed how to:
- Use quick disk analysis to automatically find lost partitions
- Add virtual partition from RAW Recovery mode
- Add virtual partition from hex-editor
These solutions have repeatedly proved their effectiveness in real-life tasks.
If you have any additional questions regarding this topic, feel free to send them to the ACE Technical Support team. If you’re looking for the professional data recovery solutions, do not hesitate to contact as at info@acelaboratory.com

 (8 votes, average: 4.50 out of 5)
I really appreciate your blog information. Your blog has explanation about the data recovery service that will be very important for everyone. Because sometimes data can be lost from system and faced the data recover problem.
Thank you for a warm feedback. We will continue to try out best with block articles in future.