


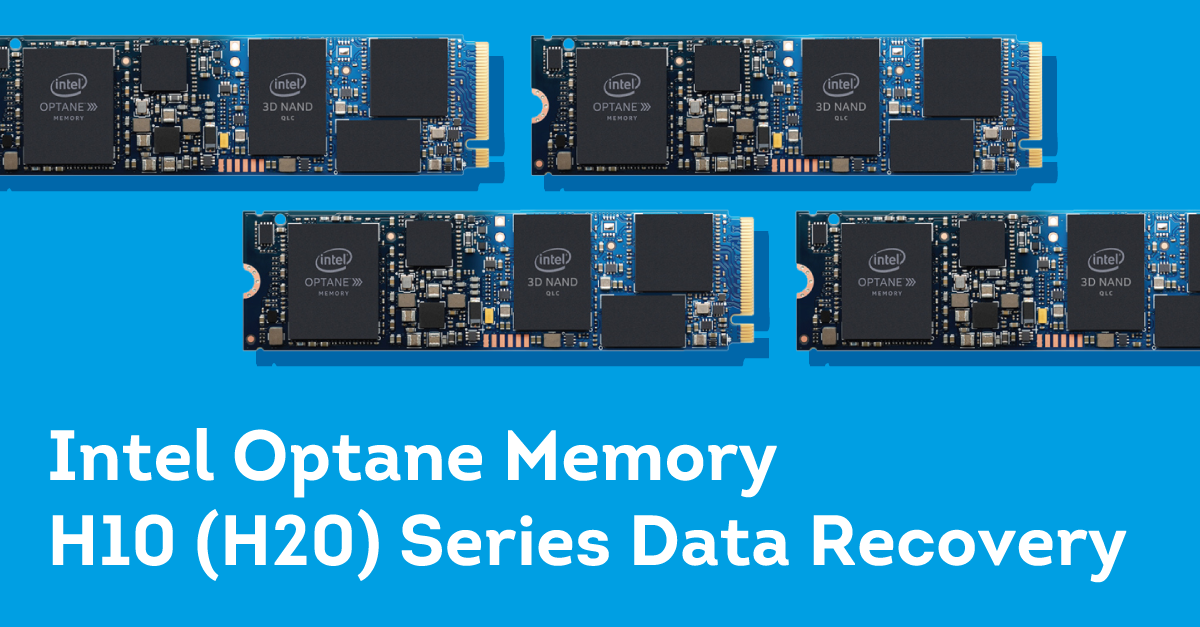
In this article, we will look at the specifics of recovering data from Intel Optane Memory H10 (H20) series. These are NVMe M.2 SSDs often found in laptops and monoblocs with Intel processors.
These drives use two types of memory: Optane memory (originally 3D XPoint) and QLC 3D NAND. Each type of memory operates on an independent channel thanks to PCIe line remapping technology, which must be supported by the PC chipset. So there are two independent drives in the same physical device.
However, they are rarely used independently, but are usually combined into a single logical drive using special software (Intel Rapid Storage and Intel Smart Response technologies). The Optane memory drive is used for data caching and the NAND memory drive is used for primary storage.
These features also affect the approach to recovering data from such drives. In this article, we will look at how to copy data correctly with PC-3000 Portable III and Portable PRO and how to get a correct image of a logical volume.
Connecting the storage device
It is possible to read data from the drives on a compatible PC (must have a modern Intel processor and chipset), but this may not be safe for the data. We recommend that you use the Portable PRO or Portable III. You will need an “SSD PCIe NVMe/AHCI + Intel Optane” adapter to access both drives.
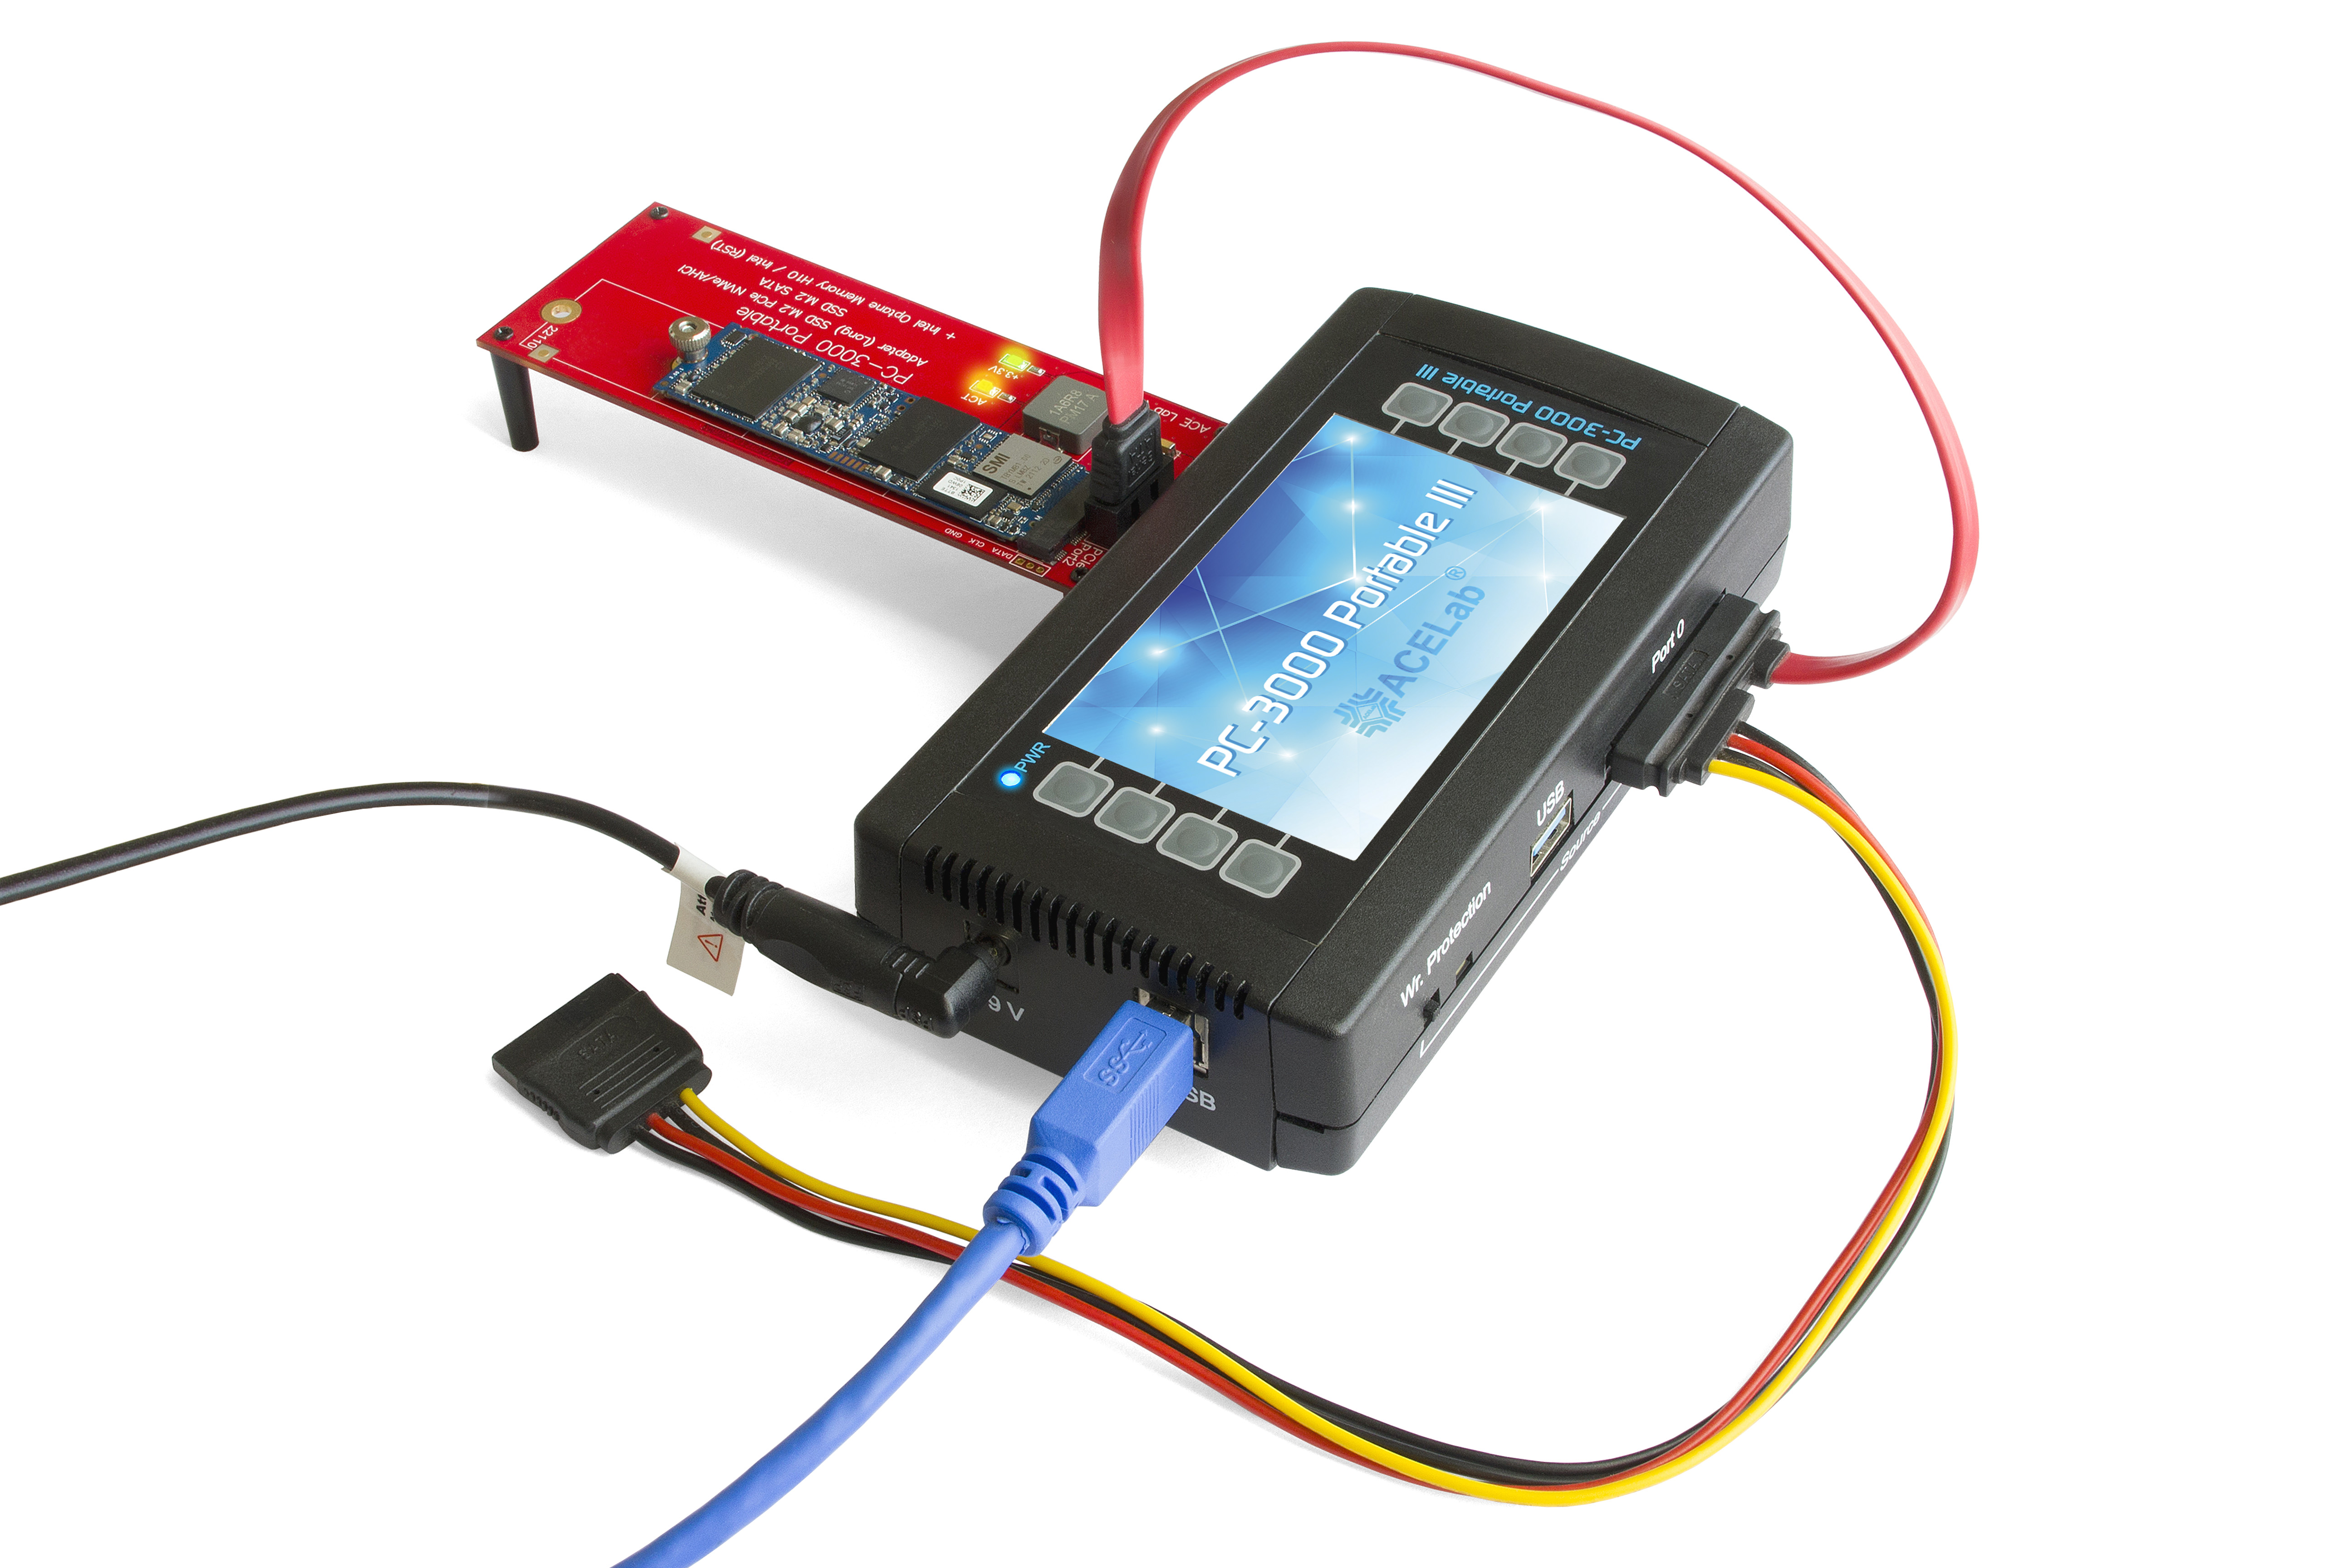
Connecting to Portable PRO
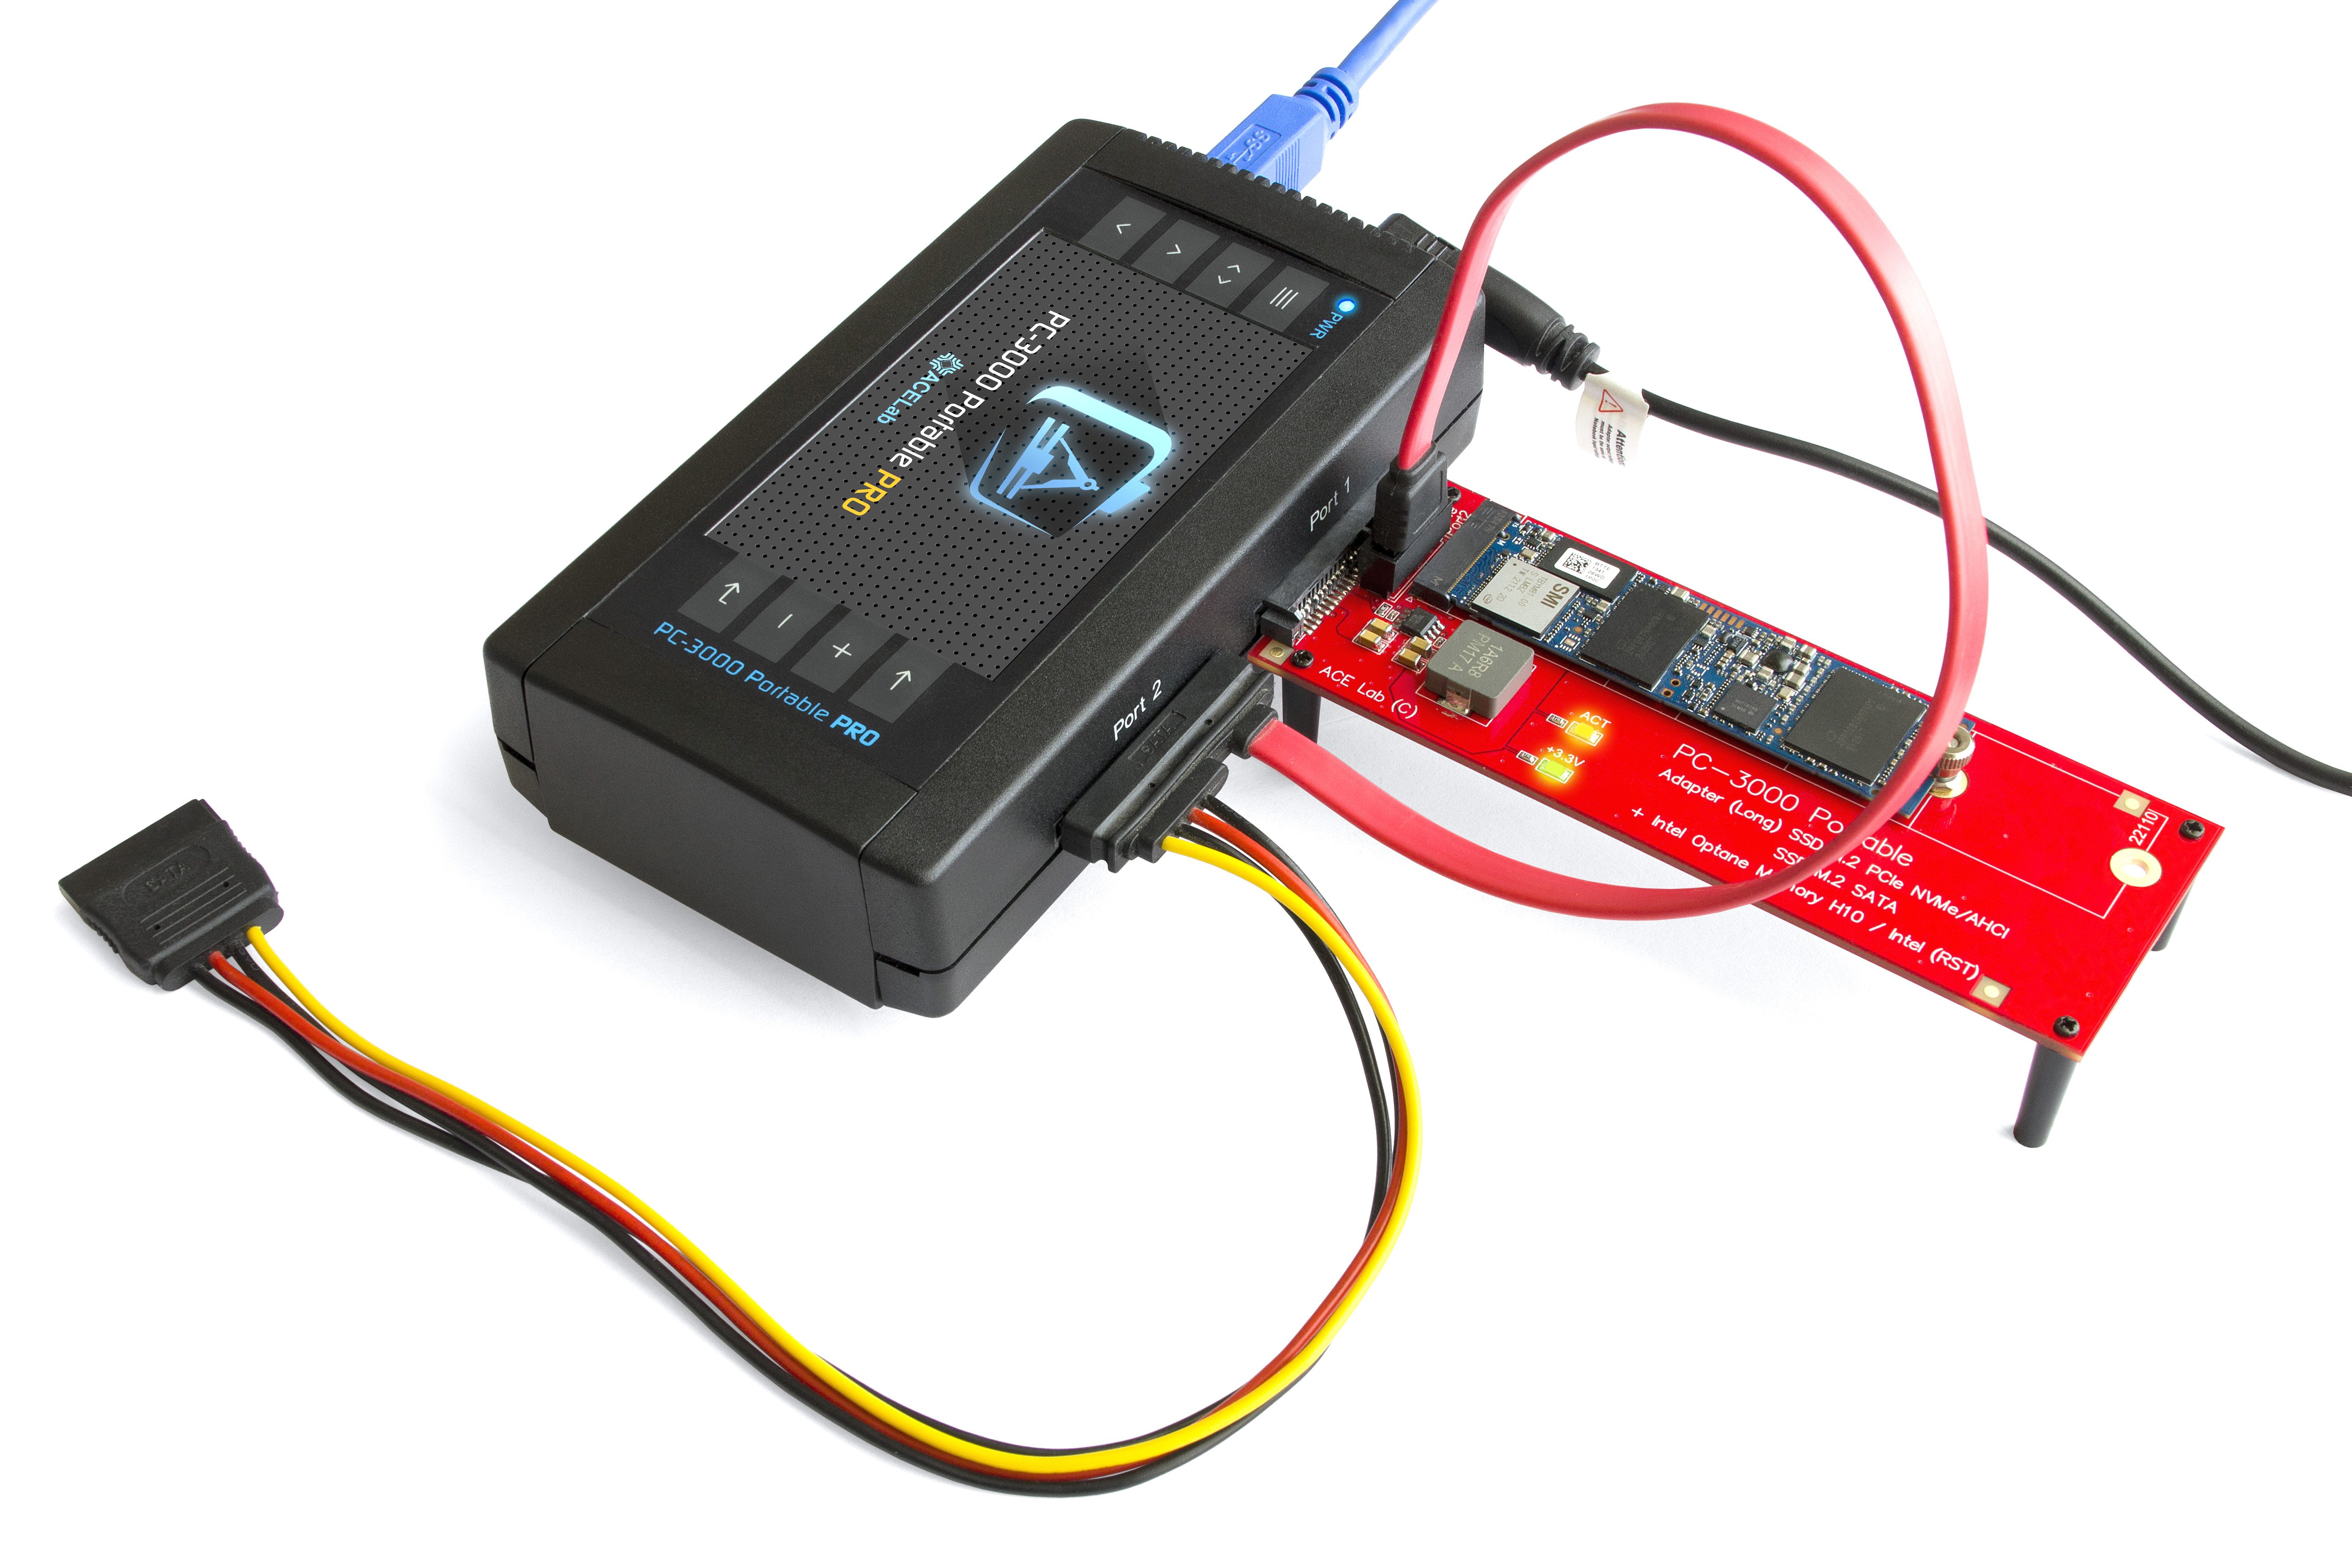
The photo above shows one of the connection options for the Portable PRO:
- A drive adapter is connected to port 1. A NAND memory based drive will be available on this port.
- A SATA cable is connected to Port 2, the other end of the cable consists of a DATA and a Power section. The DATA part is connected to an extra connector on the adapter, and the Power part is not used in any way. An Optane Memory drive will be available on this port.
Both drives are powered by the port with the adapter, so that port should be the first to power on and the last to power off.
In Portable PRO, all ports can work with NVMe drives, so you can choose any other pair of ports.
When you start the software, make sure the NVMe device type is selected for both ports. This is done automatically for the port to which the adapter is connected. For the port to which the additional output is connected, it should be done manually.
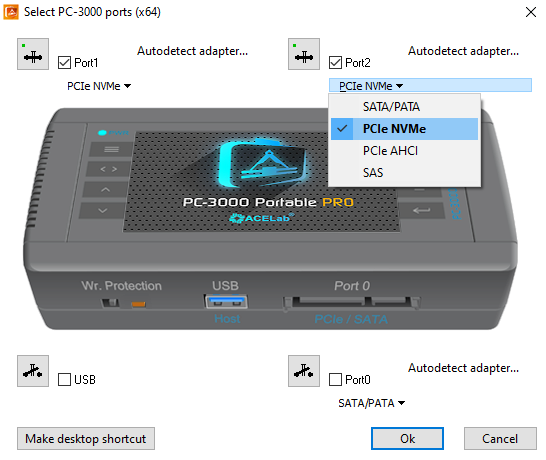
We can now work with both drives in the PC-3000 Portable PRO.
Connecting to the Portable III
The Portable III only has one port that supports NVMe drives, so you can’t connect both drives at the same time. However, you can copy both drives one at a time to create a logical image.
Connecting a NAND drive is done in the usual way: the adapter with the drive is connected to Port 0.
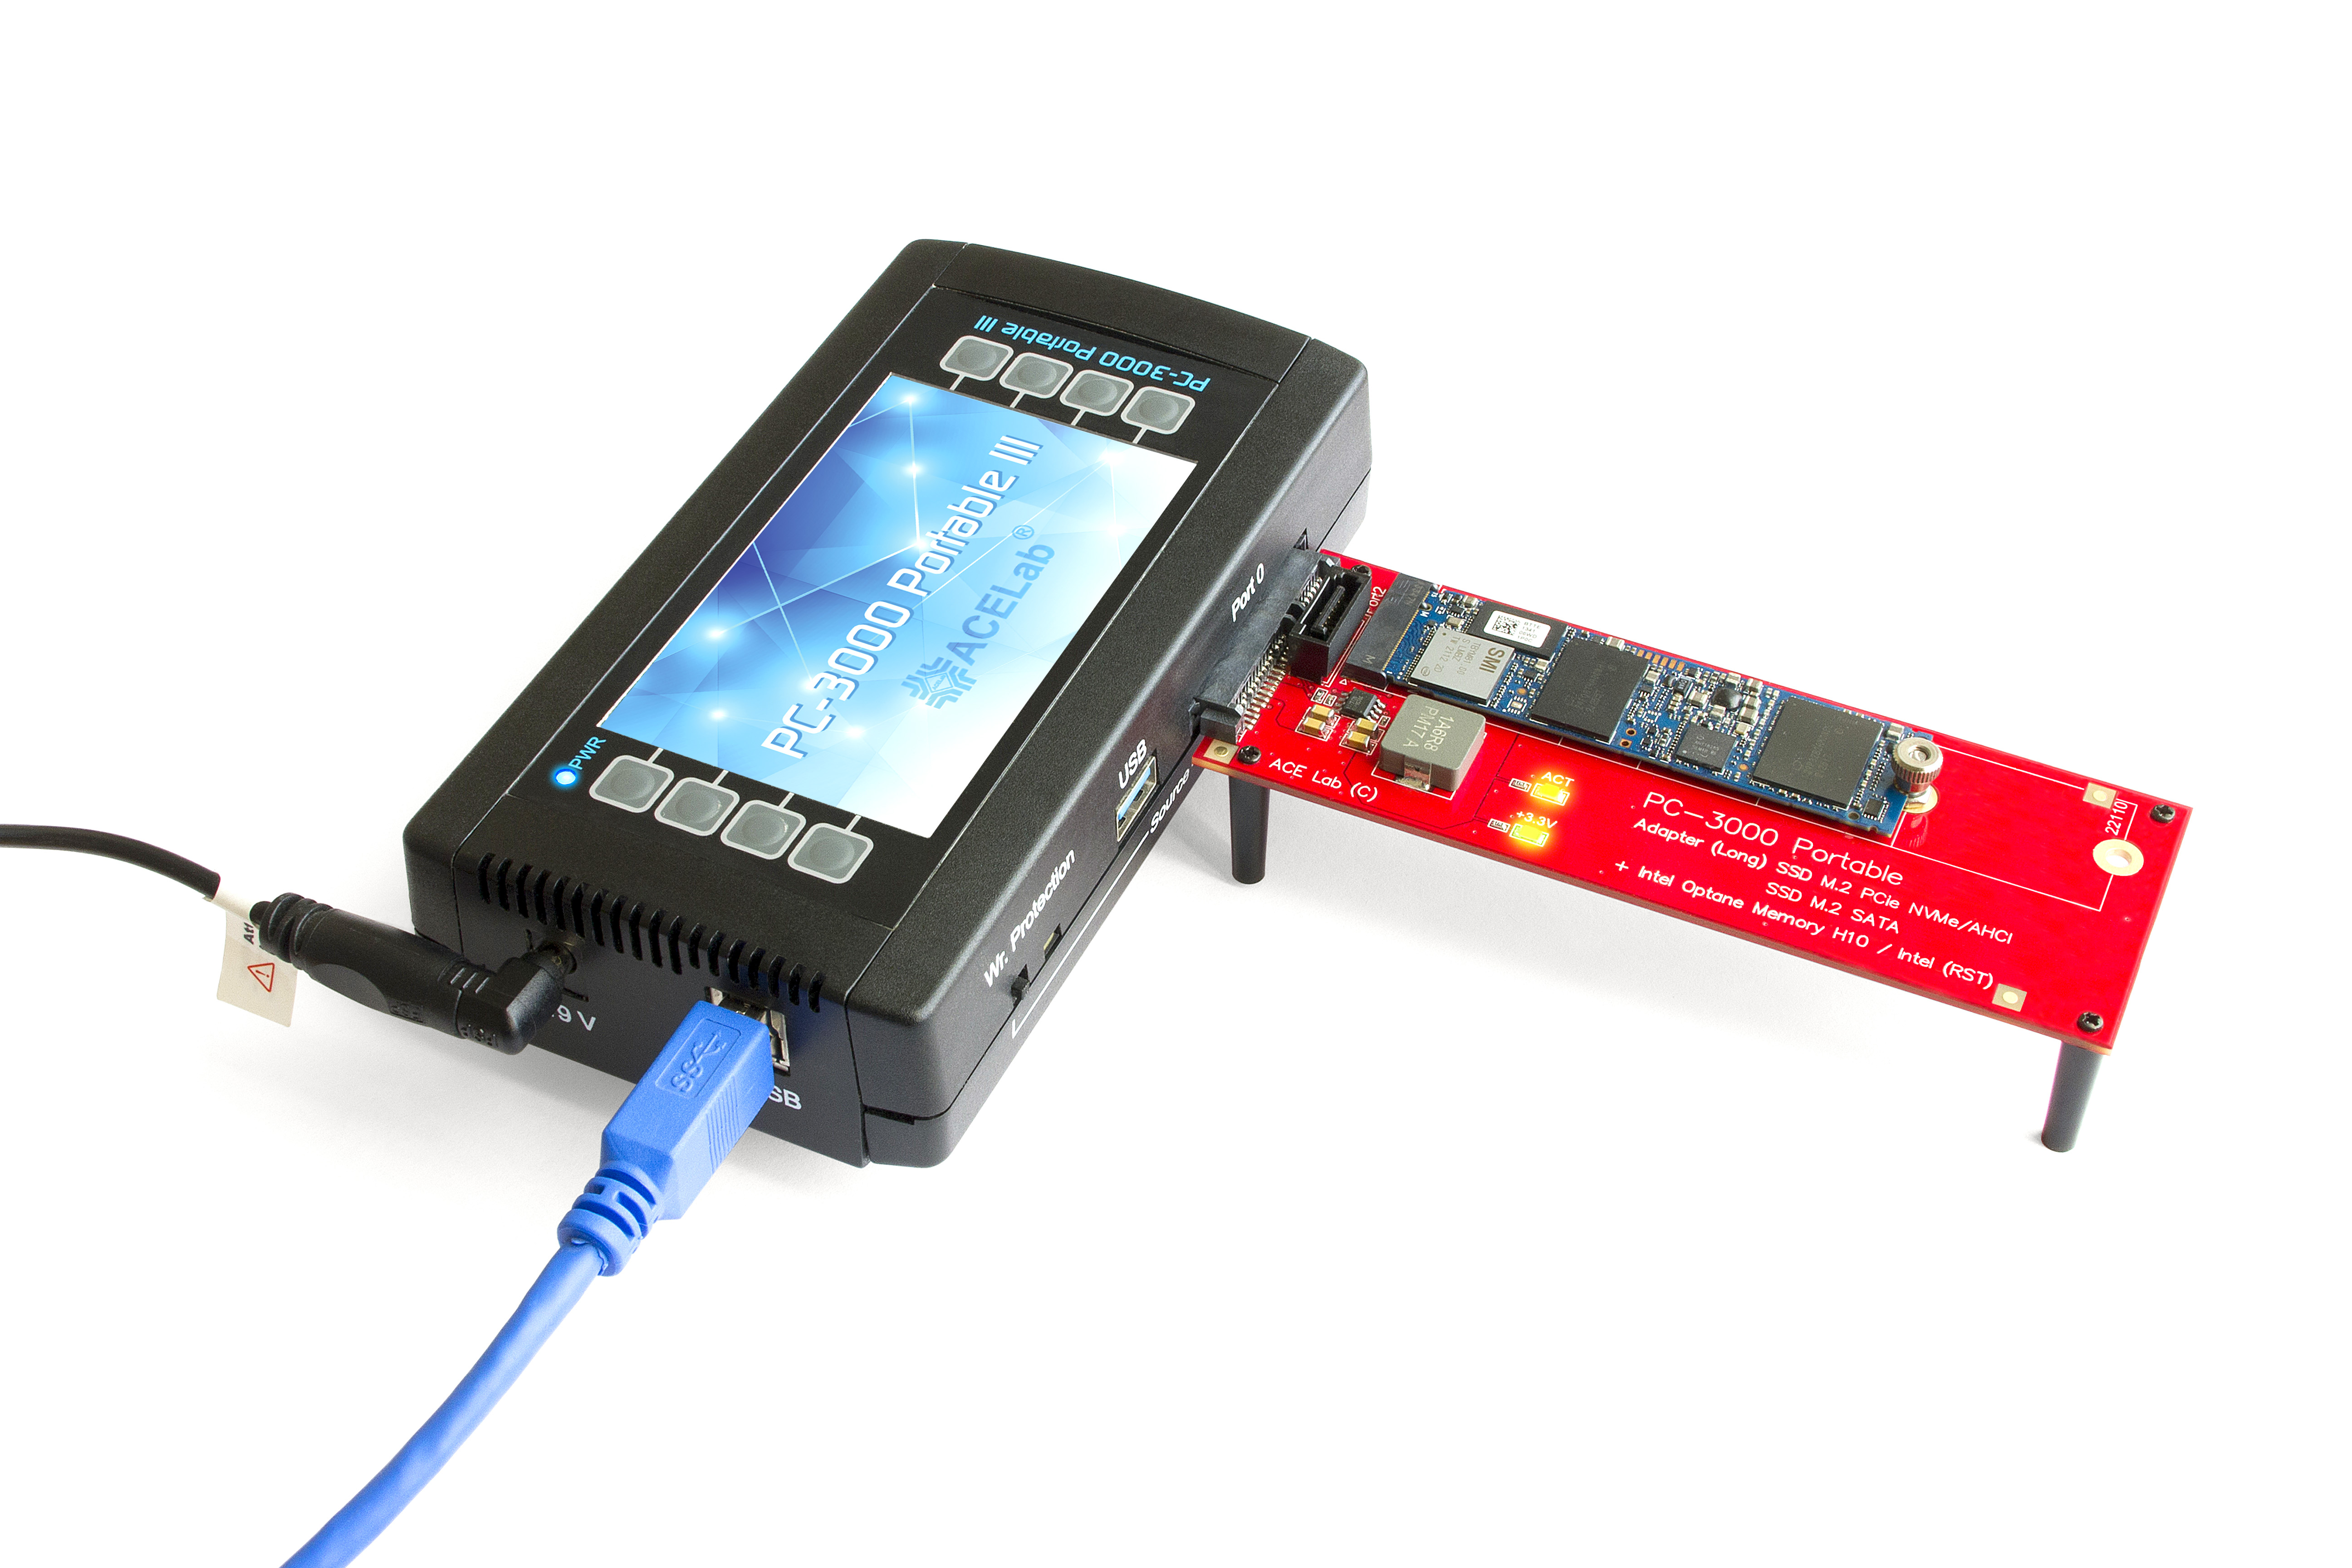
But to connect an Optane drive, you need to use 2 ports:
- Port 1 or Port 2 is where you connect the adapter to power the device.
- The SATA cable is connected to port 0, its DATA part to the additional SATA connector on the adapter. Power is not used.
The adapter port is only used for power control. The power supply rule is the same – power on the adapter port first and power it off last.
You will need to manually select the PCI-E NVMe drive type when you start the software; it will not be detected automatically.
No PHY issue
The Optane memory-based drive connects to the Portable III and Portable PRO using a SATA cable. These are the same cables used to connect SATA HDDs and SATA SSDs, which means they get a lot of use in data recovery labs. As the connector wears, the quality of the contact and the accuracy of the centring guides deteriorate. The PC-3000 is supplied with high quality cables that will continue to work reliably with SATA drives for a long time, even under active use.
An Optane-based drive is a high-speed PCIe device and therefore has very high data link requirements, including connector contact quality. Therefore, parameter variations that are acceptable with SATA drives can be critical with Optane drives. In practice, cable wear can result in a missing physical link (PHY) signal.

If you are experiencing this problem, it is recommended that you try a different SATA cable, preferably a new one. Also, make sure that power is applied in the correct order: first to the port with the adapter (NAND drive) and then to the port connected to the additional SATA connector on the adapter (Optane drive). Power should be removed in the reverse order.
Recovering a logical image
We have learned the details of connecting the drives. Next we will look at the issue of creating a valid data image when the Optane drive is used as a cache.
We assume that you have access to the data of both drives: either directly through the PC-3000 port or through a copy of it. Note that creating a logical image is supported not only in PC-3000 Portable III/PRO, but also in PC-3000 Express, UDMA-E, SAS.
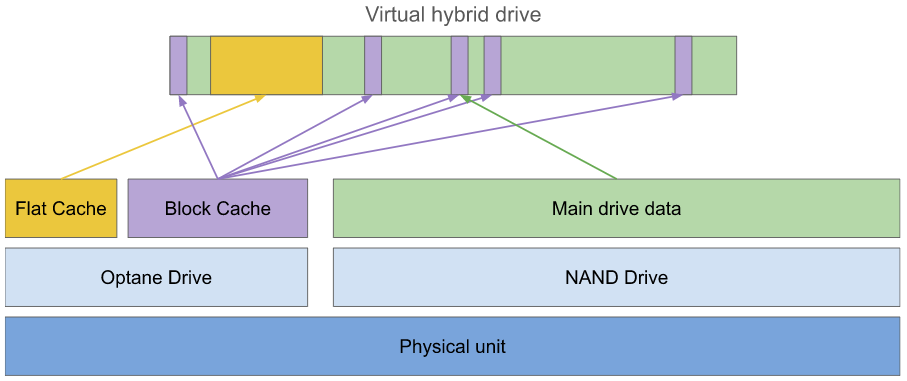
How caching works
The main drive memory (NAND-based) stores most of the data. Data is stored in the most normal way, without any additional translation.
The data cache is stored on the Optane memory drive. The cache has two parts:
- The ‘flat’ part caches the first few gigabytes at the beginning of the main partition. This is usually where the data needed to boot the operating system is stored. Sometimes the flat cache is not used.
- The ‘block’ part caches blocks of 16 sectors at random locations. Presumably, when data is written, it goes into the block cache first, and if it is not accessed frequently, it is moved to the main hard drive (NAND).
To understand the volumes we are talking about, consider a device with 1 TB of NAND memory and 32 GB of cache (Optane), where 8 GB is a flat cache and 24 GB is a block cache.
The cache typically contains data that is not on the main drive. Therefore, in order to see the current state of the FS and recover fresh files, you need to restore the cache data translation over the main drive.
Data recovery in PC-3000 RAID systems
The easiest and fastest way to create a logical image is to use RAID autodetection. In this case, the working logic is the same as with Apple Fusion Drive.
- Create a task with both drives (we repeat that you can work with copies).

- Open the form to create a new RAID and run the autodetection by metadata.
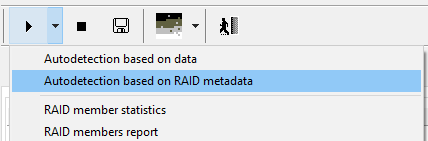
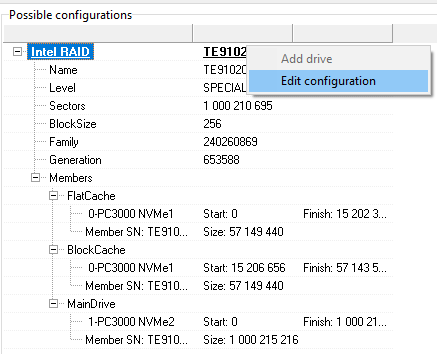
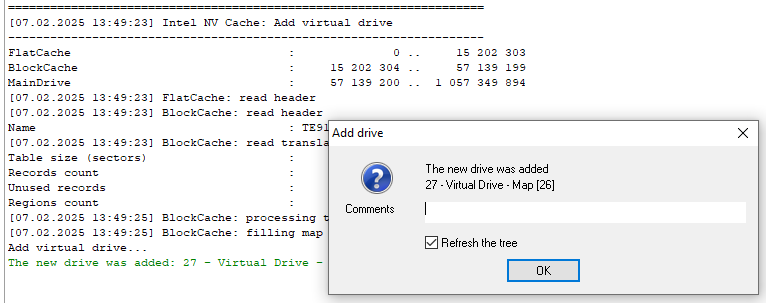
- A SPECIAL-Intel NV Cache array should be detected. Apply configuration, save it and close the RAID creation form.
- Navigate to the created drive in Explorer. The software will prompt you to perform a metadata scan — accept.
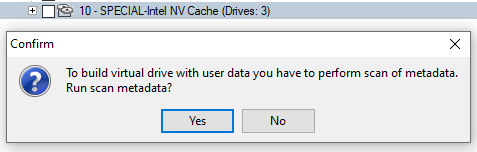
- When the process is complete, a new ‘Virtual Drive – MAP’ will be created — this is the logical cache-aware data image.
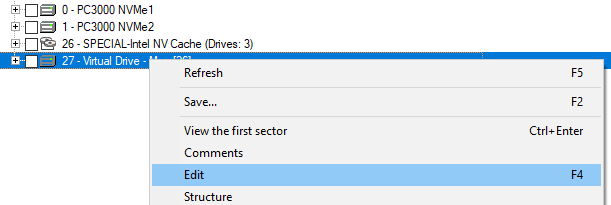
Unfortunately, there are cases where some of the most recent files have cache blocks containing inappropriate data. This may be the result of a malfunction of the drive and/or the caching software (which is the reason devices end up in Data Recovery), we are still investigating this issue. However, if necessary, the resulting Virtual Drive – Map can be edited (context menu -> Edit).
The ‘Versions’ tab will contain alternative block placement variants, if any.

Data recovery without RAID add-on
It is possible to get a logical image without the RAID add-on, but this requires writing the data from the cache over the data on the main drive. There are several ways to do this, let’s look at one of them.
In short, you need to do the following:
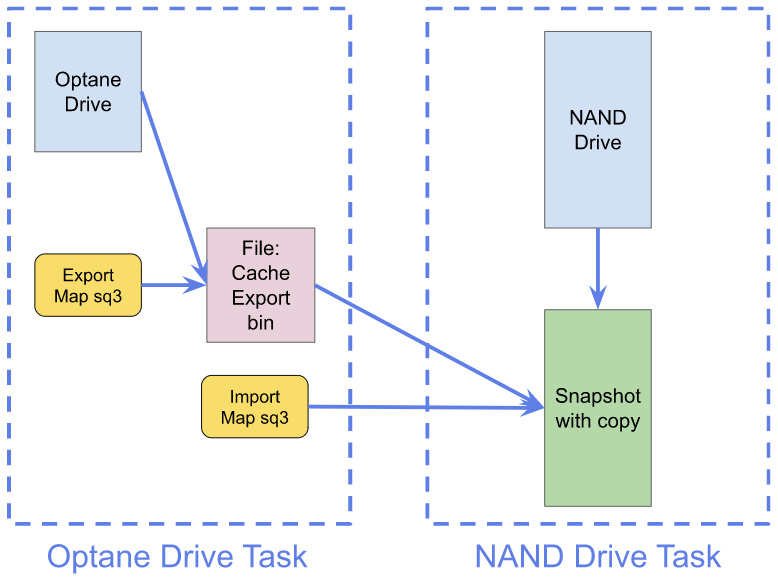
- In the Optane drive task, save the maps for exporting and importing data (ExportMap and ImportMap). The method is run from raw recovery.
- Also in the Optane drive task, save the export map data (CacheExport.bin).
- In the NAND drive task, create a drive “snapshot” with a copy.
- On the drive-snapshot, open the import map (ImportMap) and load the previously saved data (CacheExport.bin) into it.
See below for a more detailed description:
- Open the task with the cached data (Opatane drive).
- Do a RAW Recovery at the end of the drive. In the second to last sector, you should find the Intel Matrix RAID Configuration structure. Select this structure and run the “Intel NV Cache: Prepare maps for export and import” method.
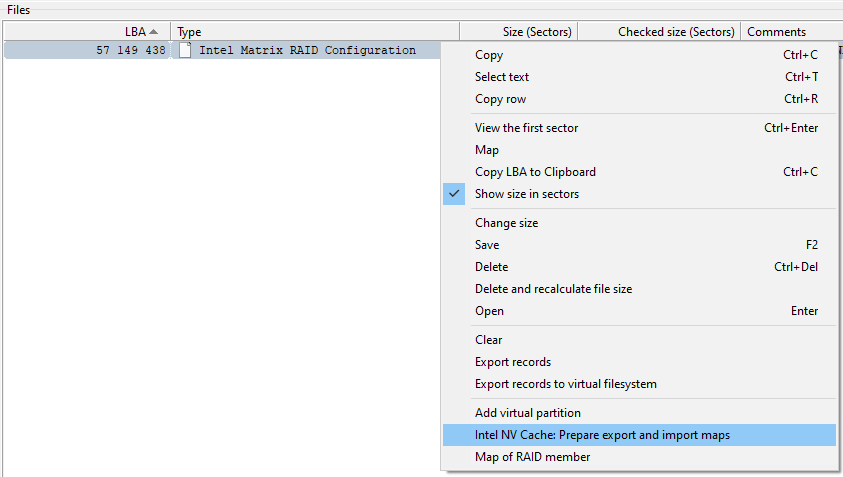
This will launch a mode that analyses the cache placement metadata and saves two maps (two chain lists) to the task directory: an export map (Intel NV Cache – ExportMap ***.sq3) and an import map (Intel NV Cache – ImportMap – ***.sq3).
- Open the export map and save all its data to a file, e.g. CacheExport.bin. You can then close the task.

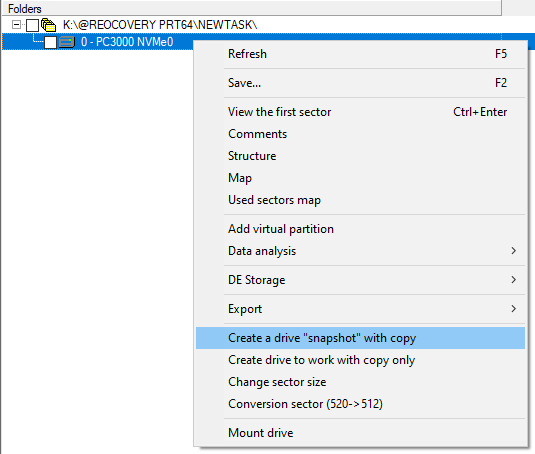
- Open the task with the main drive data (NAND drive).
- Run the “Create a drive Snapshot with copy” method from the context menu of the main drive.
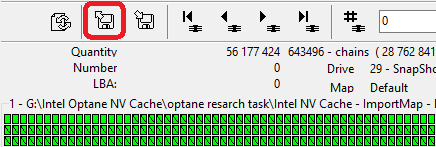
- Navigate to the new ‘Snapshot with copy’ drive, open the import map on it
and load the previously saved data (CacheExport.bin file) into it.
When you are finished, you will have a drive with the cache data correctly placed in the main drive space.
We used a Snapshot drive with a copy, which allows you to modify data safely: all changes are saved to a separate copy and read from that copy, unchanged data is read from the original disk. The original drive itself is not modified in any way.
Caching and BitLocker
As mentioned above, Intel Optane Memory H10 (H20) series devices are often found in laptops and monoblocks that already have Windows installed and configured. They are usually preconfigured with data caching and often have BitLocker encryption enabled. In most cases, the client knows the recovery key.
In such a configuration, you should deal with caching first, and then with encryption. That is, you should first create a Virtual Drive – MAP (or Snapshot with a copy) as described in the previous sections. And only then, on the resulting drive, decrypt BitLocker.
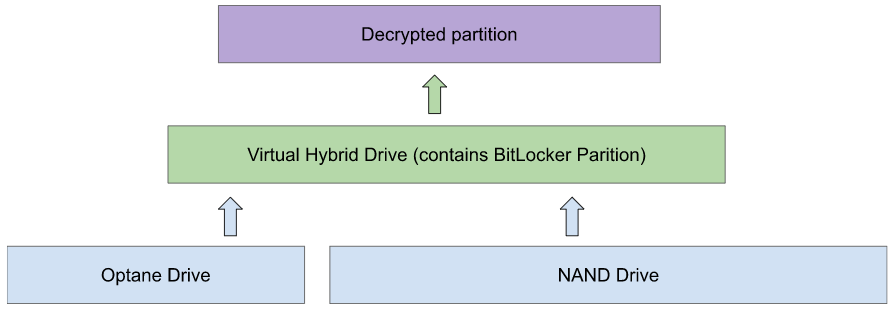
The PC-3000 software can find the BitLocker header on the NAND and Optane drives and offer to decrypt the data, but if caching is present, it will not be successful:
- The data on the main NAND drive is not consistent, so decrypting it will result in inconsistent data.
- The data on the Optane drive is not complete and organized in the block cache. This means that only a small portion – the flat cache area — can be successfully decrypted. The block cache is decrypted incorrectly because the exact sector offset from the beginning of the partition must be known for correct decryption.
Not just the H10 and H20 series
The caching technology works at the OS level, so it is not strictly specific to a particular device model. The same virtual hybrid disk can be built on the basis of a pair of HDDs and “regular” Optane (single drive on the device). The workflow is the same in this case.
Conclusion
The Intel Optane Memory H10 (H20) series combines two drives in a single device:
- a small and fast Optane memory-based drive,
- a mid-range NAND memory-based drive.
Very often, these drives are combined into a single virtual drive, where the smaller drive is used to cache data. As a result, there are two challenges to recovering data:
- reading both drives safely,
- creating a correct logical image that takes caching into account.
Both drives can be safely imaged using the Portable III and Portable PRO and the PCIe NVMe/AHCI + Intel Optane SSD adapter. The Portable PRO can read both drives simultaneously, while the Portable III will have to work sequentially. Keep in mind that both drives are powered by the port that the adapter is connected to, so it must be powered on first and powered off last.
You can create a correct image in a task using RAID auto-detection, the procedure repeats the way of working with Apple Fusion drive. Or you can export cache data in a task with an Optane drive and then import it to a task with a NAND drive, special methods in Raw Recovery and Snapshot with Copy will help here.
Likewise, you will frequently find BitLocker encryption on these devices. You should only decrypt data on a virtual hybrid drive that takes caching into account.


 (5 votes, average: 3.40 out of 5)
For those who don’t have DE RAID, this step is missed:
Between 1 & 2, make a full map of the cache, load the Intel NV Cache – Export Map
Thank you for the details, Luke.