Most RAID levels use redundancy to ensure the reliability of the array. Redundancy allows the array to continue operating without data loss if one of the drives fails. This technology was designed to save data, but if used improperly, it can lead to data loss.
In this article, we will look at the problem of an “improper rebuild”, which can make RAID data recovery very difficult or even impossible. This is a common mistake made by RAID storage users who try to restore the functionality of the array on their own. Only after failing to recover, they turn to a data recovery service. We will take a closer look at why people make this mistake.
As an example, we will use one of the easiest levels to understand — RAID-1 (Mirror). In such arrays, a complete copy of data is stored on all members (most often there are two). If one drive fails, all the data is on the other one.
Proper Rebuild
First, let’s look at the “proper rebuild” — the scenario that was originally envisioned by storage system developers.
Step 1 — Array initialization
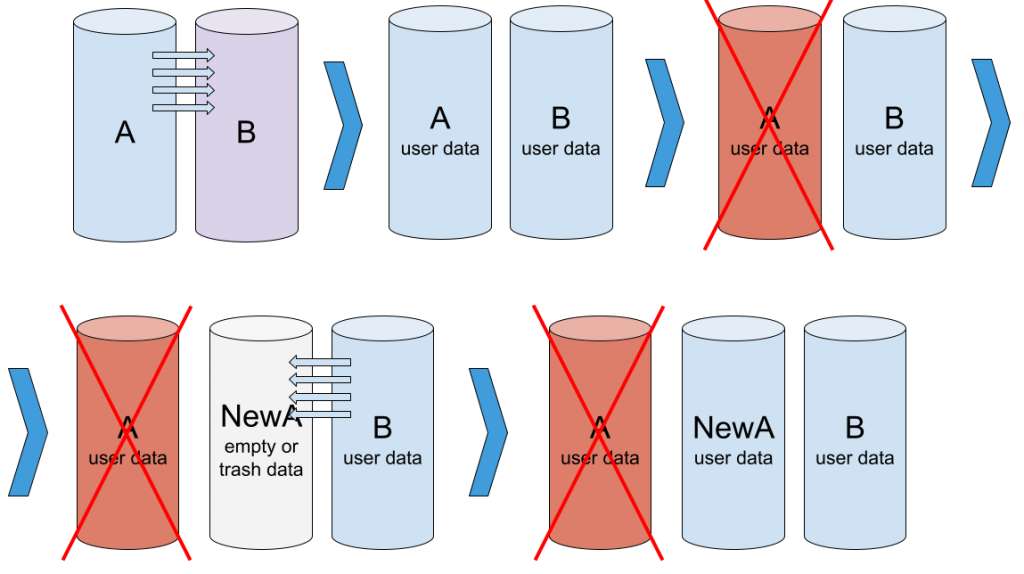
Everything starts with initializing the array. We take two new drives and create a new array based on them. The controller can’t be sure that the data on the members is the same, so it starts the initialization process that copies the data from drive A to drive B (this is the most common behavior, but it may be different for some controllers).

Array initialization: Both drives are working fine, but contain different data. Copying from A to B is in progress.
Step 2 — RAID up and running
The array is initialized, both drives are working fine, and contain the same data.
Step 3 — RAID degradation due to a single drive failure
At some point, one member of the array fails, such as member A. Due to redundancy, the array is still in operation and data is still available. However, the array no longer provides the same reliability — the failure of another drive will result in data loss. This state is called array degradation.
Step 4 — Replace and restore a member
To get the array back to normal, we remove drive A and add a new drive NewA in its place. The data on NewA does not match the data on B. So we need to rebuild the array — copy the data from B to NewA.
Step 5 — A working RAID again
At the end of this process, we will have a working array of two drives again.

The rebuild is complete, the array is functioning well: NewA and B are healthy and contain the same data. A – faulty, not used.
Proper rebuild sequence in one place
This is the sequence of events implied by both RAID controller developers and users in the case of a drive failure.
Improper Rebuild
Unfortunately, array degradation is not always handled correctly. Instead of a proper rebuild, a reinitialization is performed, which can result in data loss.
Let’s describe this chain of events in detail.
Steps 1-3 – Initialization, Normal Operation, Degradation
The first three steps are completely identical, so we’ll leave them without comment.
Step 4 — Drive replacement and array initialization
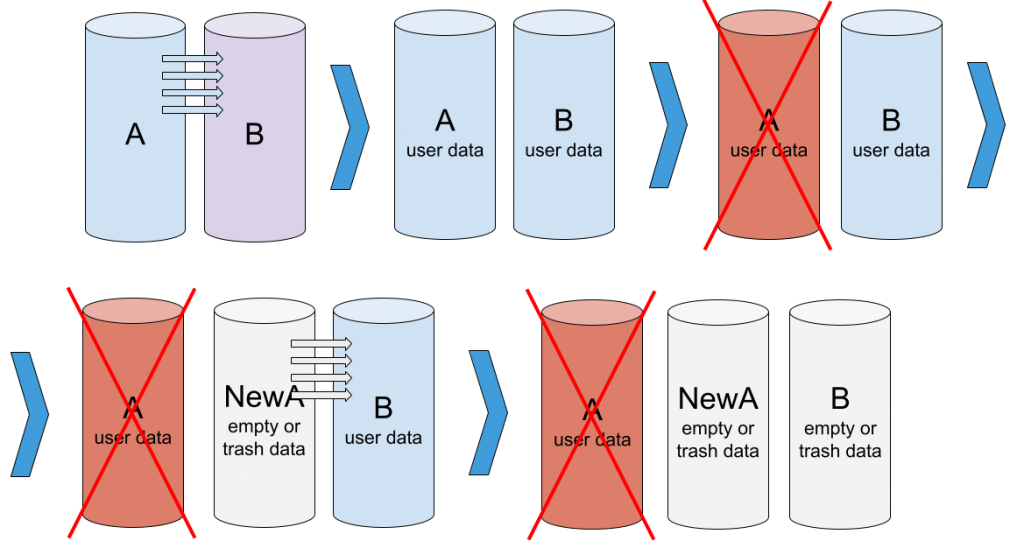
At this step an error occurs — array initialization is started instead of rebuilding. Data will be copied from one drive to another, but the direction of copying may be wrong, and then the new unwanted data will override the old needed user data.

Initialization instead of rebuild: NewA is added instead of member A. Initialization is performed. Data is copied from NewA to B.
The cause of the failure is most often a human factor. Array degradation is a very rare event for most users, and they do not always act confidently and concisely. The user does not always clearly understand what this or that command in the storage management system means: “add array, create array, assemble array, initialize array, rebuild array, restore array, reconstruct array” and so on. You can also add the factor of stress and haste. In such conditions, it is very easy to make a mistake.
Step 5 – formally well working RAID, but without user data
After initialization we get a formally working RAID, but without any user data.

Formally well-functioning array: NewA and B are healthy and identical (NewA = B), but do not contain the correct data. Only the bad drive A still contains the correct data.
Improper rebuild sequence in one place
Thus, the data saving mechanism resulted in the loss of data. The only way to get the correct data is to recover the data from the failed member A.
Conclusion
Let’s summarize the results:
- The data in a RAID-1 array must be synchronized (the same on all members).
- Initialization is the initial synchronization process that takes place before the first user data is written to the array. It doesn’t matter where the data is copied from or to.
- Rebuild is also a data synchronization procedure, but here the direction is very important, as there is needed data (on the old member) and unneeded data (on the new member).
- Sometimes users of RAID storage make a mistake and run initialization instead of rebuild. In this case, the user data can be overwritten by the unwanted data. And only then they ask for help in data recovery service. This situation is often called improper rebuild or just rebuild in data recovery slang.
In this article, we have focused on the easiest-to-understand RAID level, but the same problem is common to other levels with redundancy, such as RAID-5 or 6. It is important for the data recovery professional to be aware of the underlying issues, be able to identify them, and understand how they affect the ability to recover data.


 (3 votes, average: 3.67 out of 5)
Useful. Thanks
Strange article. No mention of the first thing you need to do when recovering a RAID is to make images of all member drives first and back up the SA. Then test if one RAID member may have stale data on it before a rebuild.
This article is not about the actions that a data recovery engineer should perform, instead it is about the actions that a RAID user often performs and then calls a data recovery service for. That is, it is about the causes of issues, not the solutions.
We edited the article for better understanding for whom it is destined.
When recovering RAID data, we do not recommend performing a rebuild or initialization. All PC-3000 RAID System tools are designed to recover data without making any changes to the data.
We believe it is important for data recovery from any RAID to communicate with a data recovery specialist so that there is no possibility of deleting or overwriting data when attempting to rebuild the RAID, as is often the case with end users who may lack experience.
Thank you very much for sharing your ideas and news!